
Booked into an LVR course and got no real idea what you’re walking into for the next few hours? You’re not on your own there. Most blokes turn up knowing it’s the ticket they need to get back on-site, and not much past that.
That’s on the providers, if we’re honest. Plenty of pages will tell you about the certificate, the compliance box, the “nationally recognised” stamp, and skip straight past what actually happens in the room. You end up rocking up cold, which is a bit rough when it’s meant to be a practical, hands-on course, not a sit-and-listen lecture.
So here’s the breakdown. UETDRRF018, the unit behind an LVR ticket, covers a specific set of rescue and resuscitation skills tied to live low voltage exposure, and it’s built to line up with what the Electrical Safety Act 2002 (Qld) expects from anyone working near that risk.
Below, we’ll run through how the session’s structured, the actual skills you’ll be drilled on, how you get assessed, and what separates a course that preps you properly from one that’s just ticking a box.
How an LVR Course Is Structured
Walk in expecting a split session, a bit of theory up front, then the bulk of your time spent actually doing the rescue drills. It’s not fifty-fifty either. The theory’s kept tight because that’s not where the skill lives.
Theory component (short)
This is the grounding bit, why the rescue sequence works the way it does, what the danger actually looks like with live low voltage, and where UETDRRF018 sits against the Electrical Safety Act 2002 (Qld). Enough to understand the why before you’re doing the how. Nobody’s making you sit through slides for hours.
Practical/scenario component (bulk of session)
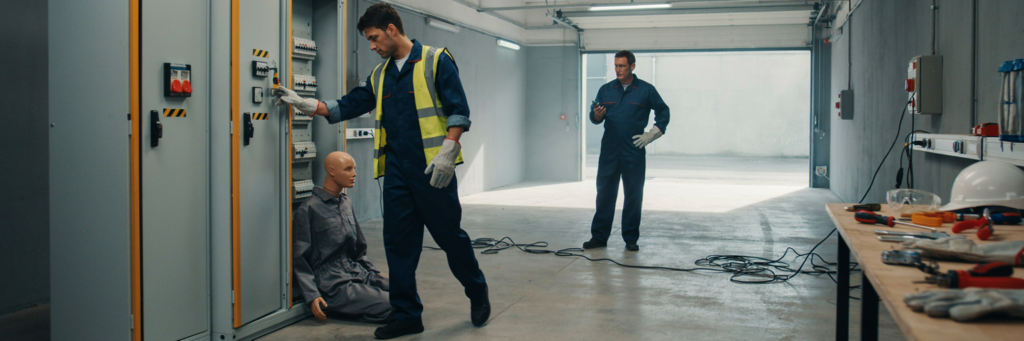
This is where most of your time goes. You’re working through the rescue sequence on a training panel setup, running the same steps you’d need on a real site: assess, isolate, approach, remove, treat. Repetition’s the point. You want this sequence to be muscle memory, not something you’re trying to recall under pressure.
Assessment: practical demonstration vs written
You’re not sitting a written exam and hoping for the best. It’s demonstrated, hands-on, in front of a trainer watching that you’re doing each step correctly and in the right order. That’s a better test of whether you can actually do this than a multiple-choice sheet ever was.
If you’re still not a hundred percent sure UETDRRF018 is the ticket your site’s asking for, worth checking our course code comparison page before you book, no point doing the structure breakdown for the wrong course.
Already know what you need? Jump straight to session times.
Once you know how the session runs, here’s what you’re actually practicing first.
⚠️ Why this bit's first: Most real-world electrical incidents don't go wrong at the rescue stage, they go wrong before that, when someone skips the assessment and rushes in. The course drills this order for a reason.
The Danger Assessment and Isolation Skills You’ll Practice
Before you’re touching anything, you’re being trained to stop and read the situation properly. This is the part that gets skipped in a lot of real-world panic, and it’s exactly why it’s first up in the course.
Recognising live panel hazards on a realistic mock-up
You’ll be working off a training panel setup built to look and behave like the real thing, not some diagram on a whiteboard. The trainer watches whether you can actually spot the hazard, where the live points are, what’s safe to approach and what isn’t, before you’ve made a single move toward the casualty. Rushing this step is the mistake that gets people hurt twice.
Correct isolation and switching-off procedure
Once you’ve assessed it, you’re drilled on the actual isolation sequence, switching off or disconnecting the power source the right way, confirming it’s actually isolated, not just assumed. This bit’s non-negotiable. Get it wrong and you’re not rescuing anyone, you’re becoming a second casualty on the same panel.
All of this ties back to what’s expected of you under the Electrical Safety Act 2002 (Qld). This isn’t training built in isolation from the regs, it’s built to match them directly.
Getting the isolation right is what makes everything after it safe to attempt. Which brings us to the actual rescue.
🎯 Worth knowing: "Non-contact" isn't a figure of speech here. Every technique in this section is built so your hands, and your body, never touch the casualty while they're still part of the circuit.
Non-Contact Rescue Technique: What You’ll Actually Do
This is the bit most people picture when they think “LVR course,” actually getting the casualty clear. But there’s a very specific, very deliberate way it’s done, and none of it involves grabbing someone and pulling.
Rescue equipment used (rescue hooks, insulated tools)
You’ll be trained on the actual gear, rescue hooks, insulated tools, the kit that lets you move a casualty without putting your own hands anywhere near the hazard. Knowing the theory of non-contact rescue is one thing. Handling the actual hook, feeling how it works, practicing the motion, that’s what makes it usable under pressure instead of something you vaguely remember reading about.
Safe approach and casualty removal without becoming a second casualty
This is the whole point of the “non-contact” name. Every step is built around one rule: you do not become a second victim on the same panel. That means how you approach, how you position yourself, how you actually move the casualty clear, all of it’s drilled so it becomes automatic, because the moment you’re relying on instinct instead of training is the moment instinct tells you to just grab them.
This lines up with ANZCOR‘s guidance on non-contact rescue principles. The course isn’t inventing its own method, it’s teaching the recognised approach.
Still not sure UETDRRF018 is the one your site’s actually asking for? Check the course code comparison page before you go further, better to confirm now than after you’ve booked the wrong one.
Getting the casualty clear is only half the job, what happens next is where most of the assessment weight sits.
CPR and Resuscitation for Electrical Shock: How It’s Different
If you’ve already got a standard CPR ticket, you might be tempted to think this bit’s a repeat. It’s not. Electrical shock changes what you’re dealing with, and the course treats it that way.
Why electrical shock CPR differs from standard first aid CPR
A casualty who’s gone into cardiac arrest from electrical shock isn’t the same situation as your standard first-aid CPR scenario. The mechanism’s different, the injuries alongside it are often different, burns, muscle damage, the works, and the course walks you through what that means for how you respond. This isn’t your HLTAID CPR ticket with a different label stuck on it. It’s built specifically around what electrical shock does to a body.
Defibrillation considerations post-electrical-incident
There’s also specific ground covered on defibrillation after an electrical incident, what to be aware of, what changes when the arrest was caused by electrical contact rather than a general cardiac event. Worth paying proper attention here, because it’s the kind of detail that generic CPR training just doesn’t touch.
The course follows ANZCOR guidelines throughout this section, recognised, current resuscitation standards, not something built in-house.
You’ve now got the rescue and the resuscitation skills. Next is what you do once the immediate danger’s handled and you’re waiting on paramedics.
🩹 The part people forget about: Getting a casualty breathing again feels like the finish line, but paramedics still need to arrive. What happens in that gap matters just as much as the rescue itself.
Post-Rescue First Aid: Burns, Shock, and Stabilisation
Getting the casualty clear and breathing again isn’t the end of it. You’ve still got to keep them stable until paramedics take over, and electrical incidents bring their own specific injuries to manage.
Managing electrical burns until paramedics arrive
Electrical burns aren’t always what they look like on the surface, the visible damage can be deceptive, and there’s often more going on beneath it than a standard burn. You’ll cover how to manage this properly while you’re waiting for help to arrive, not just slap something on it and hope for the best.
Recognising and managing shock
Shock’s a real risk after an electrical incident and it’s easy to miss if you’re not looking for it. The course covers what to watch for and how to keep the casualty as stable as possible until emergency services get there.
What you’ll be able to recognise and manage:
- Signs of electrical burns, including damage that may not be obvious on the surface
- Signs the casualty is going into shock
- How to keep a casualty stable while waiting for paramedics
- When and how to hand over information to arriving emergency services
You’ve now got the full skill set, here’s how it’s actually marked.
How You’re Assessed and What Happens If You Don’t Pass First Time
Practical assessment criteria
You’re marked on doing the sequence, assess, isolate, approach, remove, resuscitate if needed, stabilise, correctly and in the right order, in front of a trainer. It’s not about reciting anything back. It’s about showing you can actually do it.
Re-assessment/resit process
If you don’t get there the first time, it’s not a big drama. You’re not failed and sent packing, there’s a resit process, and the trainer’s there to help you get across the line, not catch you out. This is one of those things a lot of providers make sound scary when it really doesn’t need to be. People don’t nail every step first, and that’s fine, that’s what the process is built for.
Conclusion
So that’s the whole picture, not just the ticket you walk away with, but what actually happens in the room to get you there. Danger assessment, isolation, non-contact rescue, electrical shock CPR, post-rescue first aid. Five distinct skill sets, each one built on the last, and none of it’s filler.
It’s worth saying again, this isn’t your standard first-aid CPR course with a new sticker on it. Electrical shock changes what’s happening to a body, and the training reflects that properly instead of glossing over it. If you’ve already got a CPR ticket, don’t walk in thinking you’ve seen this bit before.
The assessment side trips a lot of people up before they’ve even started, mostly because nobody tells them how it actually works. It’s practical, it’s demonstrated in front of a trainer, and if you don’t get there the first time, there’s a rest built into the process. Nobody’s trying to catch you out.
None of this exists in a vacuum either. Every part of it lines up with the Electrical Safety Act 2002 (Qld) and ANZCOR’s guidelines, which is exactly why a head contractor or site induction system will actually accept it. That’s not marketing talk, that’s the whole reason the course is built the way it is.
If you’ve been turned away at induction, or you can already see it coming, the fastest move is knowing exactly what you’re walking into before you book. Now you do. No more turning up guessing.
Get the right course sorted, get it done properly, and get back on-site without the same problem catching you out again next time your ticket’s due.
Book Your First Aid Training Now
Fast, affordable, and nationally accredited training delivered by professionals who care
Frequently Asked Questions
Q.What if I fail the assessment?
You're not just cut loose. There's a rest process built into the course, and the trainer works with you to get you through it properly rather than just marking you off as failed and moving on. Not nailing every step first is normal, not a red flag.
Q.How long does the course take?
It runs as a single session that combines a short theory component with hands-on practical training and assessment. Exact timing depends on the group and how the session's scheduled, so it's worth confirming when you book rather than assuming.
Q.Do I need my own PPE?
This isn't something covered in the course materials we're working from here, so the safest move is to check directly with your trainer before your session rather than guessing and turning up under-prepared.
Making first aid training more affordable for
every classroom
We believe every student deserves access to life-saving first aid knowledge. That’s why we offer specially reduced pricing for schools and educational groups. Whether you’re booking for a single class, a year group, or your entire school, our flexible packages make training more accessible and cost-effective — without compromising quality.
